
Professional drivers are able to save money by eating foods preserved by canning, whether done commercially or at home.
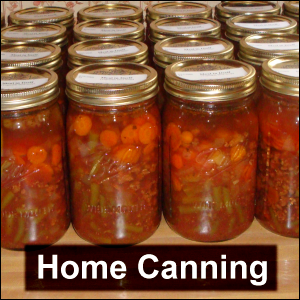 Many types of foodstuffs are preserved this way.
The nature of the food will determine by which method canned food is to be processed: either boiling water bath or under pressure.
We discovered the joys of preserving home cooked food this way and will provide some tips, advantages and disadvantages.

We have included this page on this site because this method of food preparation is an option for a professional driver’s home support team.
Imagine the convenience of having a hearty home-cooked meal ready to pop into a hot pot, crock pot or microwave oven.
It’s a little taste of home on the road.
The Enlightenment
Vicki was first exposed to canning food from an elderly lady at Mike’s and her church.
Unfortunately, as the lady had only the equipment to process food by boiling water system, she habitually preserved food that way that should have been processed by pressure canner.
She said that she had never had a problem with the foods she had preserved that way and we hope she never does; however, foods that require pressure canning must be processed under pressure.
Vicki knows this all too well.
She attempted to follow her friend’s advice with a batch of ham, green beans and potatoes by the boiling water method.
She ended up with a bunch of spoiled food. Please don’t repeat this.
Get yourself a Ball Blue Book (like the one shown here from Amazon.com, with whom we have an affiliate relationship) and follow the instructions to the letter.
The Joys and Advantages
In preserving your own food, you know exactly what goes into it.
You know the quality of the ingredients and that it is seasoned to your taste.
For example, we like split pea soup with ham, but one of the commercial manufacturers makes their version so salty that it is hard for us to eat!
Vicki makes home made split pea soup from scratch that is seasoned exactly as we like it.
There is no waste and it is delicious!
The Disadvantages and Their Flip-Side
The two disadvantages to canning are:
- the initial investment into equipment and
- a significant investment of time every time you do it.
However, the more you use your equipment, the lower your per-use cost will be.
You might be able to split the cost of some of the equipment with like-minded friends and have a home party periodically, where everyone is able to process their own food.
Many hands help make the work go faster.
Furthermore, you may think of the time you spend preparing, processing and cleaning up as an investment in both health and cost savings.
Sometimes used Ball jars or Mason jars are on sale at yard sales or flea markets.
Just make sure that before you buy them, they are in good enough shape to withstand the rigors of the heat and pressure they will undergo during processing.
Inspect them for chips, cracks or other signs of fatigue.
Do not re-use old glass mayonnaise jars or other types of jars that have not been manufactured for this purpose.
Not all foods are meant to be canned.
Among cooking methods, some foods are better broiled, baked, braised, fried, grilled or eaten raw.
Among food preservation methods, some foods are better dehydrated, frozen, pickled or smoked. (There are also other food preservation methods.)
What We Use
We have had consistently good results in using the Ball brand of jars (wide-mouth only) and corresponding lids and bands.
You may re-use the jars and bands but a new lid must be used on each jar processed.
This is so that it will seal properly. (Used lids already bear the imprint of a previous seal and cannot be relied upon to seal properly again.)
The Variety
The sky is the limit on the types of food preserved this way. Here are some of the foodstuffs that Vicki has canned:
- Baked beans (using white navy beans);
- Pinto beans;
- Cranberry beans;
- Black eyed peas;
- Split pea soup (both with and without ham);
- Chili (with two types of kidney beans, field peas, etc.);
- Chicken vegetable soup;
- Meal in Itself (modified to be like vegetable beef soup);
- Beef stew;
- Blueberries;
- Peaches (to eat straight out of the jar and in making peach crisp);
- Tomatoes;
- Pickles; and
- Squash and zucchini.
Vicki would like to be able to can pasta, but have never figured out how to process it for the required period of time without the noodles going completely mushy.
A Big Canning Project: 4 Batches of Meal in Itself
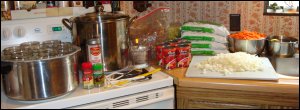 In June 2009, Vicki canned four batches of a vegetable beef soup concoction modified from a recipe called “Meal in Itself.”
She took photos at key times during the preparation and is sharing them with you here.
She gathered all of the food, sauces and spices.
For Meal in Itself, she used:
- frozen green beans,
- sliced carrots,
- diced onion,
- diced celery,
- cooked hamburger meat,
- beef bouillon,
- tomato sauce,
- sweet basil,
- bay leaves (which were removed prior to processing), and
- water.
The pieces of equipment Vicki used were:
- an electric skillet in which to cook the ground beef,
- a pancake turner to assist with cooking the beef,
- a large colander in which to drain the cooked beef (and later to hold the green beans),
- a large cutting board,
- suitable knives for prepping the onions, celery and carrots,
- a food processor to slice the carrots,
- a variety of bowls,
- a can opener,
- a set of measuring spoons,
- a tablespoon,
- a 12-quart steam pressure canner (pot, jar rack, lid, gasket and 10-pound weight),
- a 20-quart stock pot with lid,
- a small pot for heating lids and bands,
- 28 wide-mouth quart jars with lids and bands to match,
- a jar lifter,
- a magnetic lid lifter,
- a wide-mouth funnel,
- a stainless steel skimmer (like a large, flat, slotted spoon),
- a 4-cup measuring cup (to assist in filling jars with stock),
- a stiff spatula to remove air bubbles,
- a stove with two large burners and two small burners,
- a number of towels and dishcloths,
- a British Berkefeld water filter to filter the water used in the food,
- a sink with a gooseneck faucet (for both its draining capabilities and access to water), and
- dish washing soap for clean-up.
Some of these tools are specific — but invaluable — when it comes to canning food.
For example, since Vicki uses wide-mouth jars, having a wide-mouth funnel is important to her.
You will want to use either a pair of tongs or a magnetic lid lifter to remove the lids from their boiling water bath before putting them on the jars just before sealing and processing them.
Since the lids are designed to “nest” against each other (making it difficult to separate them in water), the magnetic lid lifter is ideal for separating them.
Also, you will need a jar lifter for lifting the processed jars out of the boiling water when the cooking cycle is completed.
The most common tools for this work are often combined in sets like the one shown here.
Vicki strongly recommends that if you are preparing to can foods, you buy a set of tools like this.
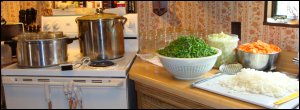 Vicki prepared to fill the jars with raw or frozen vegetables, attempting to add approximately the same amount of each kind by hand to each jar.
 When all of the quart jars were filled with raw or frozen vegetables and cooked ground beef, they were ready to receive the stock prepared in the stock pot.
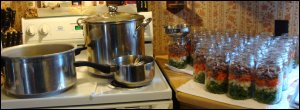
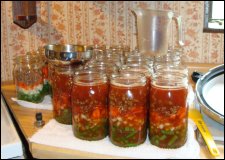 The first batch of seven wide-mouth quart jars received the stock and was ready to be capped with corresponding lids and bands.
Vicki used the spatula to remove air bubbles from the contents and make sure that the stock level left 1″ headspace.
The mouths of the jars were wiped clean.
With the magnetic lid lifter, Vicki removed the lids and bands from the pot in which they were warmed in water.
Vicki likes to line up each lid with the front of each jar (just because she think it looks more uniform).
Vicki likes doing canning work, if possible, in an assembly line fashion.
On this particular day, she did not use all of the cooked ground beef or celery that was shown in one of the photos above; also, she cooked up a little more stock than had originally been prepared to finish filling all of the jars.
She carefully looked for and removed all of the bay leaves from the stock so that they would not be consumed.
She tightened the bands on the jars hand-tight.
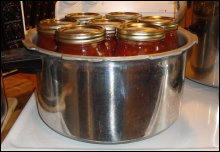 After the jar rack was placed in the bottom of the steam pressure canner, Vicki loaded seven of the wide-mouth jars, making sure there was sufficient water in the pot to process the jars for the time required before closing it up.
The jars touched neither the sides of the pot nor each other.
 Considering the kind of food prepared, each batch required 90 minutes processing at 10 pounds of pressure.
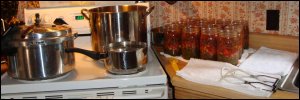
It is important for each batch to warm up and cool down properly.
To help make the turnaround time a little faster, Vicki “pre-heated” the next batch of filled jars in water in the stock pot.
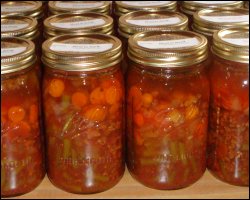
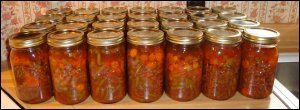 The lovely result after all this work was four batches of seven quarts each (28 quarts total) of a modified version of Meal in Itself (vegetable beef soup).
 Later, after all of the jars were thoroughly cooled and assured of being sealed, Vicki cleaned them and labeled them with the contents, date of processing and batch number.
There’s something so satisfying about carefully removing jars with home canned food from a pressure canner, letting them cool, and hearing each one “ping” (which is the sound of the lid contracting).
Conclusion
The next day, Vicki had one of the quarts of Meal in Itself for dinner, and it was absolutely delicious.
We strongly encourage the home support teams of professional drivers to consider home canning as a way to help the drives save money and eat healthfully on the road.
We realize that drivers who live in their trucks full-time (having no residence or are “homeless“) cannot preserve food this way.
However, drivers can still find some good buys when it comes to commercially canned foods.
Oftentimes, such a product like ravioli or Chinese food will cost less than a restaurant meal, especially one served in a truck stop.
![]() Money saving tip: We’ve already mentioned the tips about possibly sharing the cost of the equipment with others and buying high quality, used jars.
Money saving tip: We’ve already mentioned the tips about possibly sharing the cost of the equipment with others and buying high quality, used jars.
If you know of someone who has the equipment but seldom uses it, consider asking to borrow it. Just make sure that you follow the directions, use it in a timely fashion and clean it thoroughly before returning it.
You may also save money by buying ingredients in bulk or on sale. Some folks have no problem with buying foods that have been discounted because they are near their expiration dates.
There are ways to save money on produce, such as growing your own, buying it at a farmer’s market, or joining a cooperative.
Consider the savings of eating a hearty home canned vegetable beef soup and a salad in your truck versus paying for the privilege of eating from a restaurant’s soup and salad bar.
Alternatively, if you do not want to preserve food this way at home, consider commercially canned meals that will cost less than a restaurant meal.
You will want to eat home canned food in a timely manner. However, Vicki reports that she has eaten a pint of black eyed peas that she canned 7 years before. Your results may vary.
Return from Home Canning Foods Can Save Truckers a Lot of Money on the Road to our Food and Recipes page or our Truck Drivers Money Saving Tips home page.